Groups
The Manage Groups section displays all the groups for which you have manage permissions. These groups can exist across various organizational levels such as Organization, Department, Sub-Department, or any other custom levels as needed.

Note:
- If a user manages an organization-level group (e.g., an organization named “XYZ”), they will see “XYZ” listed under Manage Groups. Additionally, the user will automatically be able to manage all subgroups under “XYZ,” including departments and sub-departments linked to them.
- If a user is assigned to manage a Department-Level group (e.g., “Sales Department”) and there are no subgroups under it, the user can only manage that specific department. The user’s assigned role determines permissions for managing these groups.
Note: For the Skill Lake installations integrated through a third-party service, the groups created through that service will be displayed in the Groups page.

- Click on the Organization to view the departments created under it.
- You can view the profile picture, group admins, departments created under the parent organization, members of the organization, and courses in which everyone in the organization is enrolled.
Departments
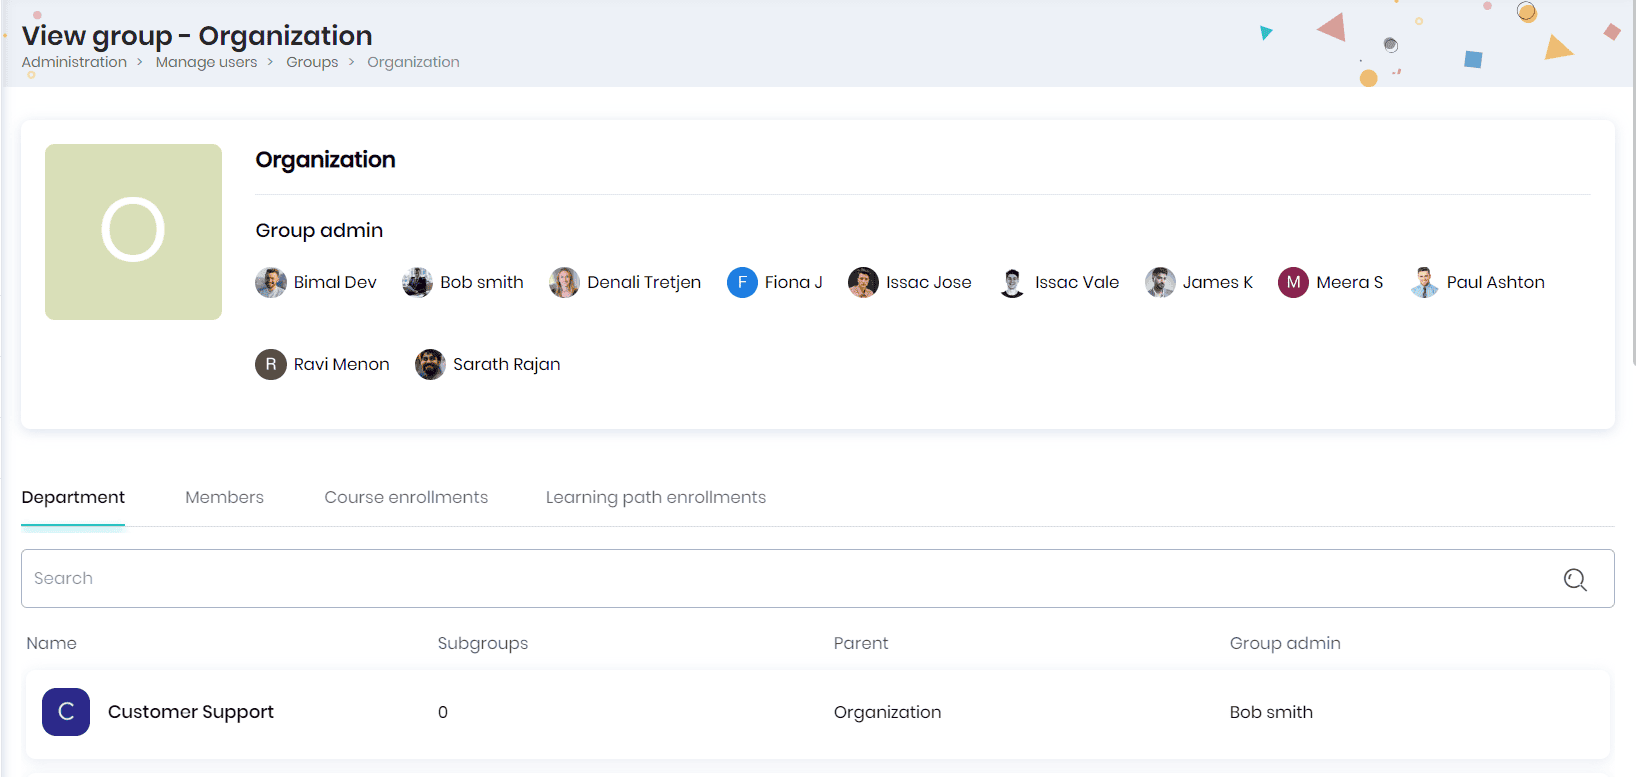
- If the organization name is XYZ, the Departments tab will display all departments under XYZ. These are groups created at the Department Level with XYZ set as their parent.
- If you click on a department, it will display all Sub-Departments under it. These are groups created at the Sub-Department Level with the selected department as their parent.

- Click on any group under the ‘Department’ tab to view the group admins, profile picture, group members, courses and learning paths enrolled to the department (and organization).
- Click on the member’s name to view his profile and on the ‘Edit’ icon to edit the user profile.
- The Course Enrollment tab allows the respective group admin to assign courses to their groups. From here, the admin can assign courses, manage course enrollment settings, and more. When a course is assigned, all members of the groups and subgroups will be automatically enrolled to the course. This is helpful when planning courses for entire organizations or groups.
- The Learning path enrollments tab allows the respective group admin to assign learning paths to their groups. The admin can assign a learning path, manage learning path assignment settings, and more. When a learning path is assigned, all members of the groups and subgroups will be automatically enrolled to the learning path. This is helpful when planning a learning path for entire organizations or groups.
Members
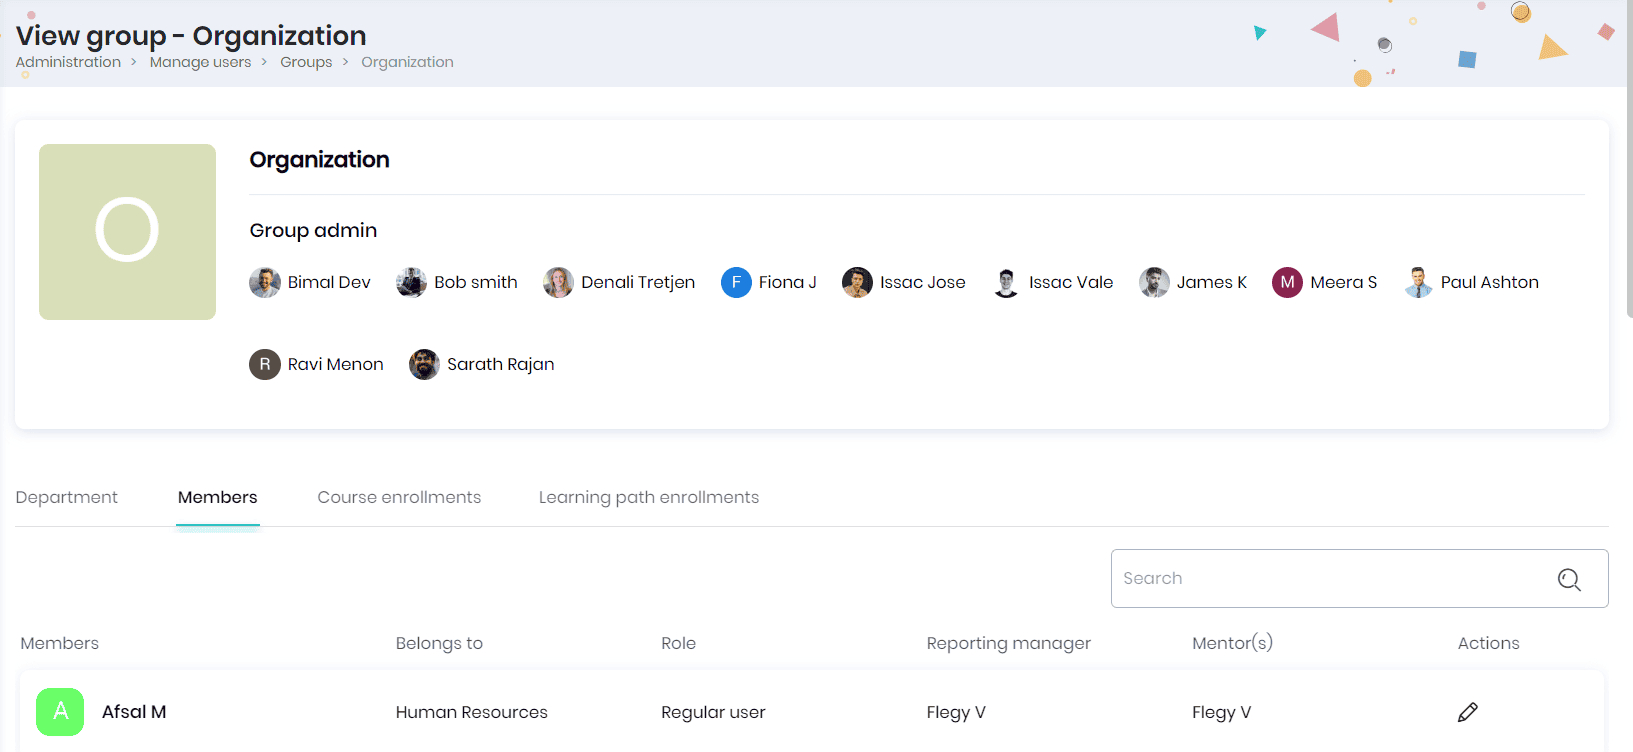
- Click on the Members tab to view the members assigned to this department.
- You can view the member details such as name, belongs to department, role, reporting manager, and mentors.
- Click on the member’s name to view his profile.
- Click on the Add user button to create a new user.
- Click on the Edit icon to edit the user profile.
- Click on the Delete icon to delete the user from the department.
Course Enrollments
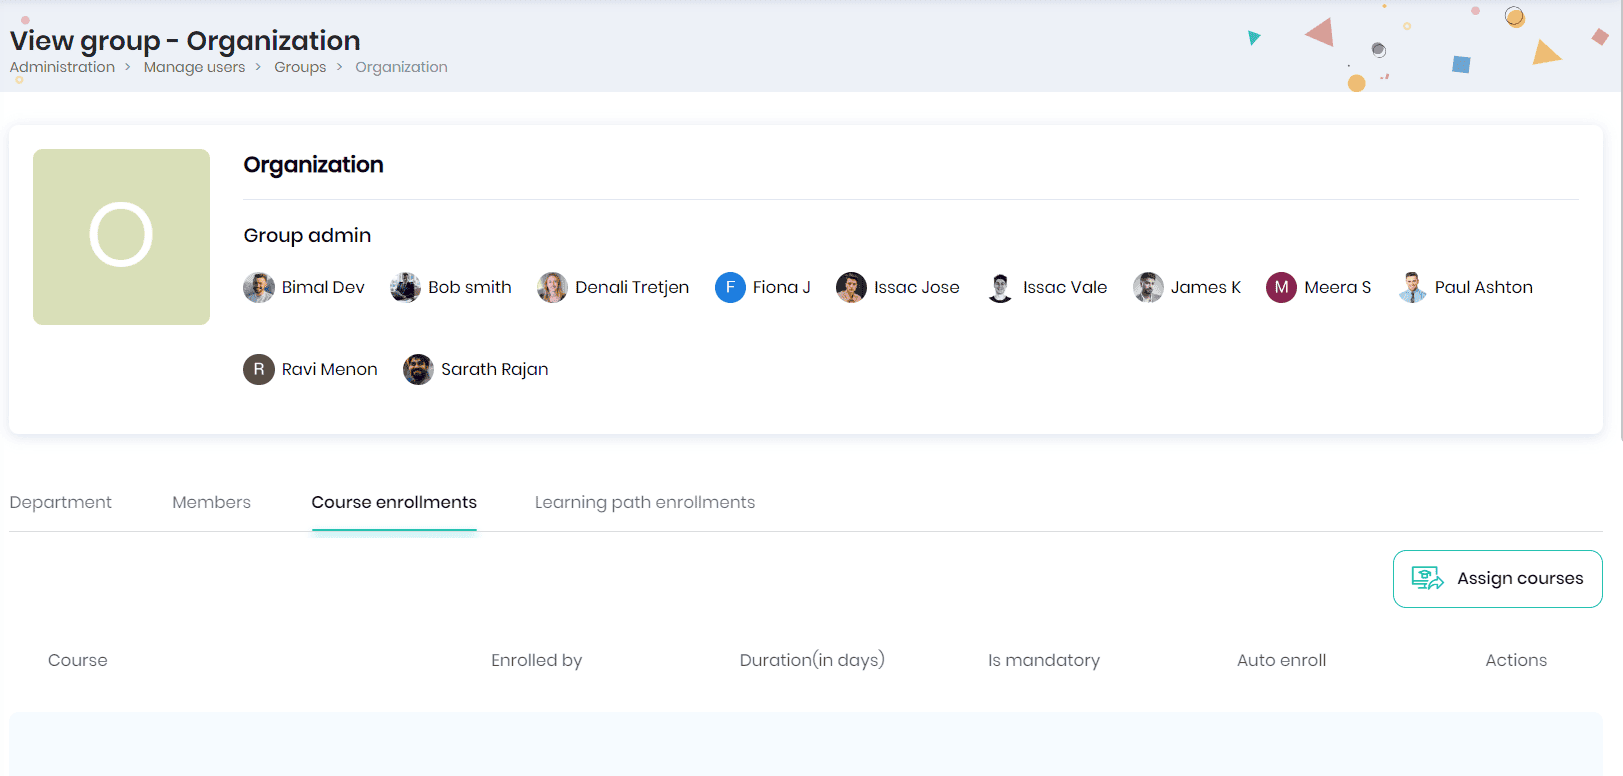
- The Course Enrollment tab allows the respective group admin to assign courses to their groups. From here, the admin can assign courses, manage course enrollment settings, and more. When a course is assigned, all members of the groups and subgroups are automatically enrolled in it. This is helpful when planning courses for entire organizations or groups.
Note: Admins cannot manage individual user enrollments from this section. To do so, they can go to Browse Courses > Group Enrollment Options under the course.
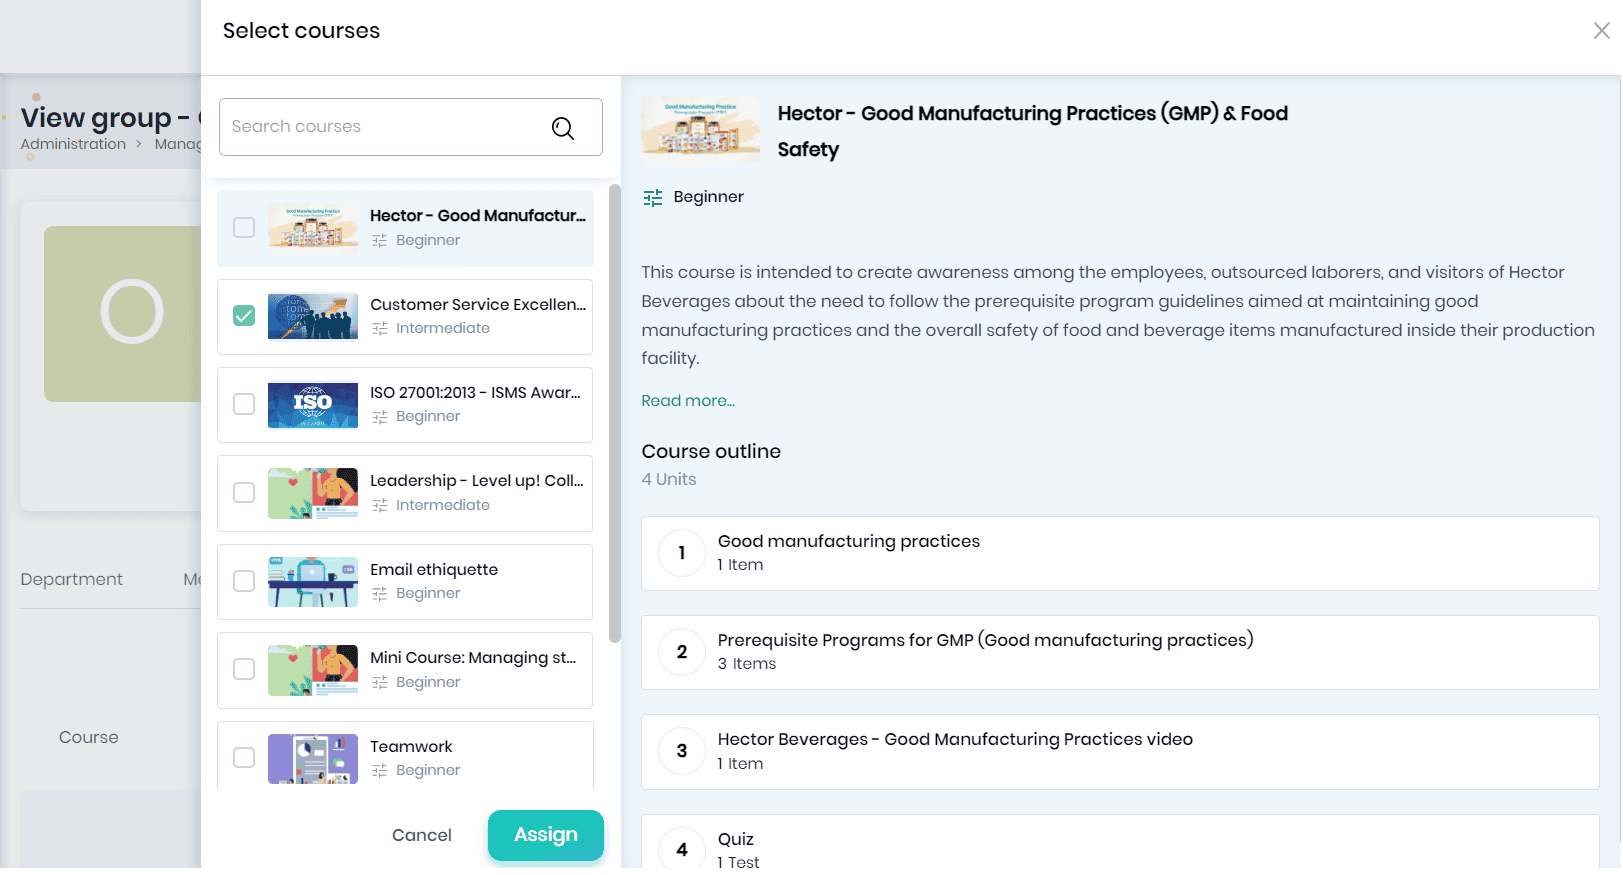
- Click on the Assign courses button to open the Select courses pop-up.
- You can select the required courses you want to assign to the group and click the Assign button.
Note: The courses for which you have selected this group in the ‘who can see this course’ (Manage courses > course > course settings) will be available for selection.
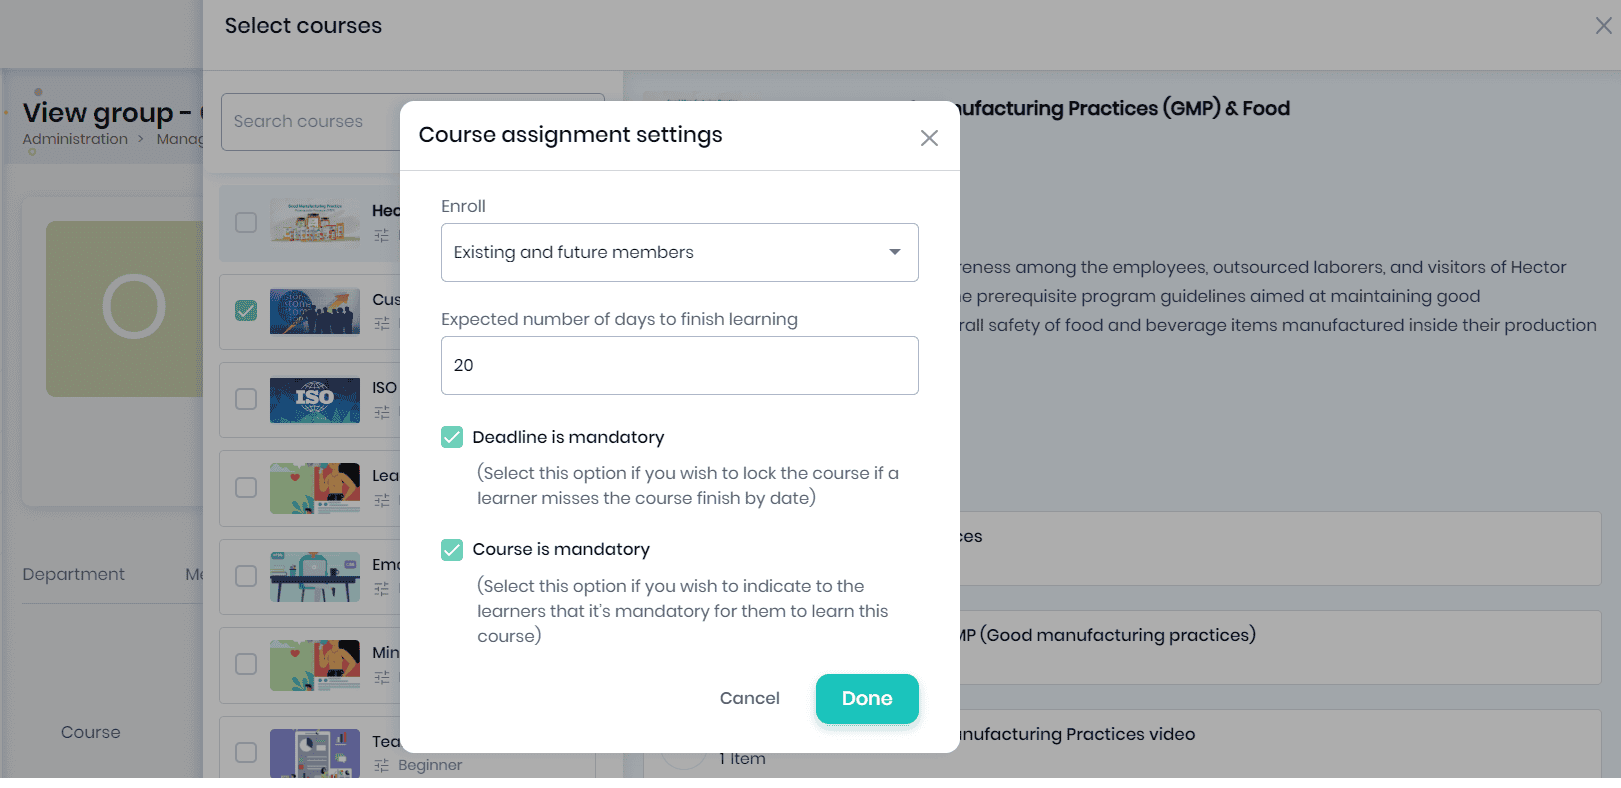
- The course assignment settings pop-up appears, where you can enroll the courses for existing members, future members and existing & future members.
- Enter the expected number of days to complete the course, and tick the mandatory deadline or course mandatory options. Marking a course as mandatory will indicate learners that they are required to complete the course. Setting a mandatory deadline will lock course access for learners if they miss the course finish by date (deadline).
- Click on the Done button to save the course assignment settings.
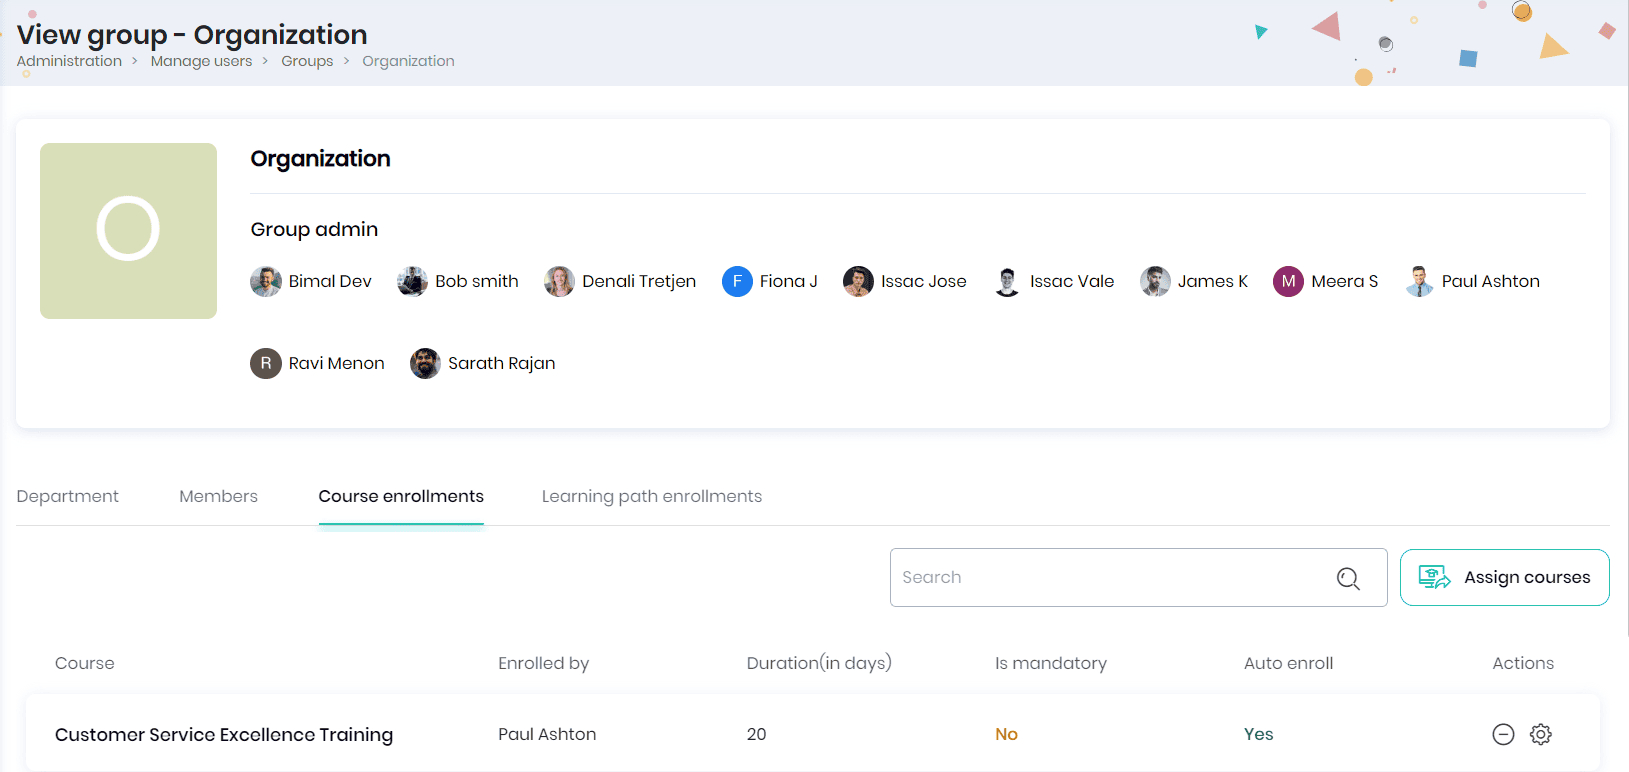
- The assigned courses will be displayed in the Course enrollments tab.
- The course name, enrolled by, duration (in days), is mandatory, auto enroll and actions.
- You may click on the Unenroll icon to unenroll the group from the course.
- Click on the Settings icon to edit the course enrollment settings.
Learning path enrollments
- The Learning path Enrollments tab allows the respective group admin to assign learning paths to their groups. From here, the admin can assign learning paths, manage learning path assignment settings, and more. When a learning path is assigned, all members of the groups and subgroups will be automatically enrolled to the learning path. This is helpful when planning learning paths for the entire organization or groups.
Note: Admins cannot manage individual user enrollments from this section. To manage individual enrollments, this can be done via Browse > Learning path > Group Enrollment Options.
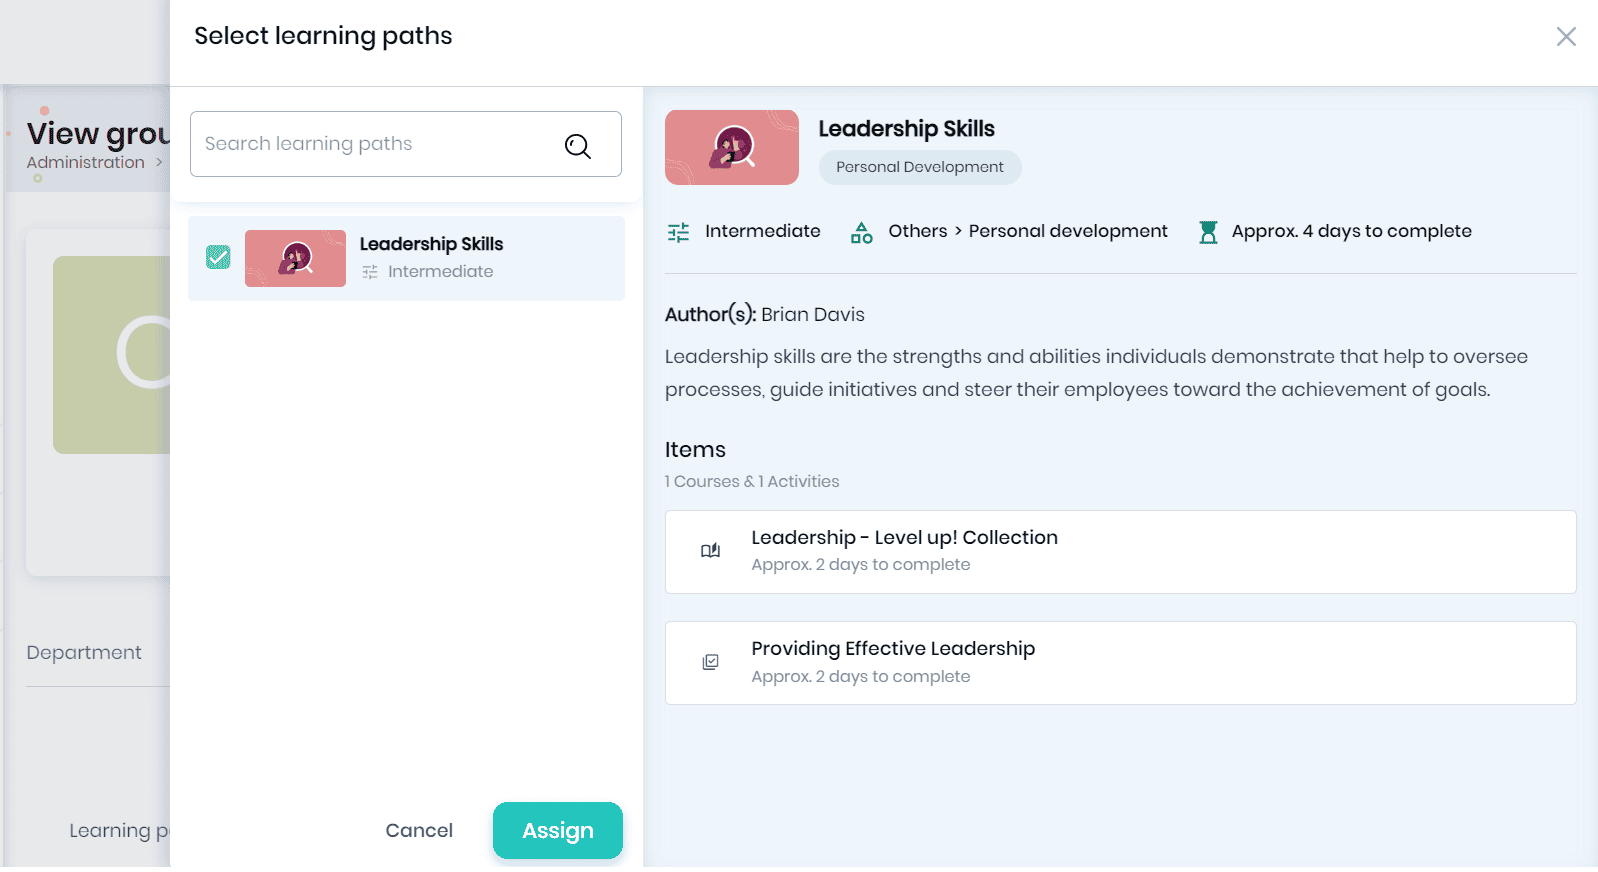
- Click on Assign Learning path button to assign a learning path to this group.
- You may select the required learning paths you want to assign to the group and click the Assign button.
Note: The learning paths for which you have selected this group in the ‘who can see this learning path’ (Manage courses > learning path > path settings) will be available for selection.
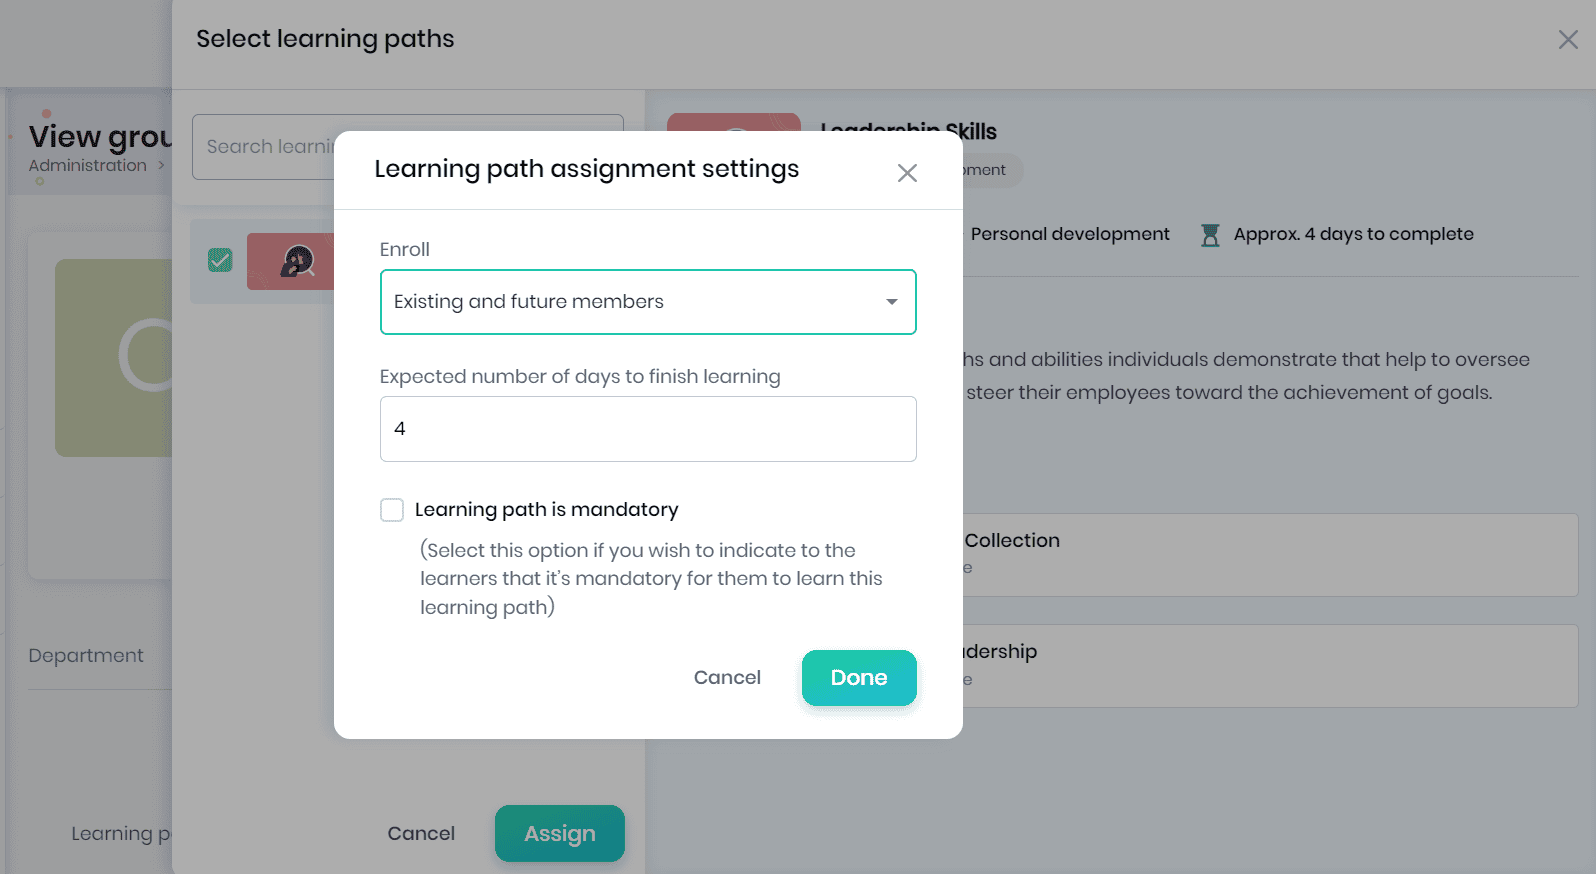
- The learning path assignment settings pop-up appears, where you can enroll the learning paths for existing members, future members and existing & future members.
- Enter the expected number of days to finish the learning, tick the learning path mandatory options.
- Click on the Done button to save the learning path assignment settings.
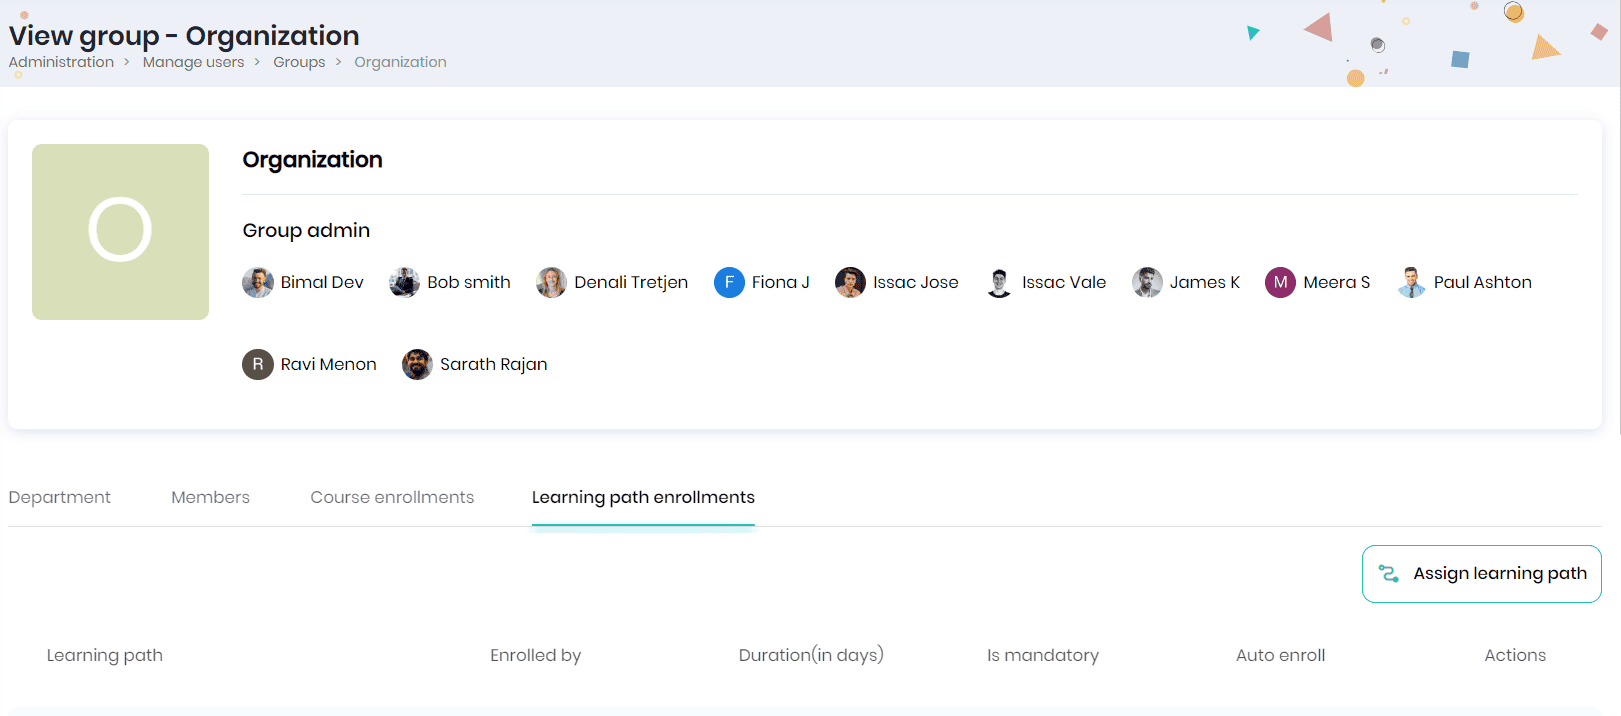
- The assigned learning paths will be displayed in the Learning path enrollments tab.
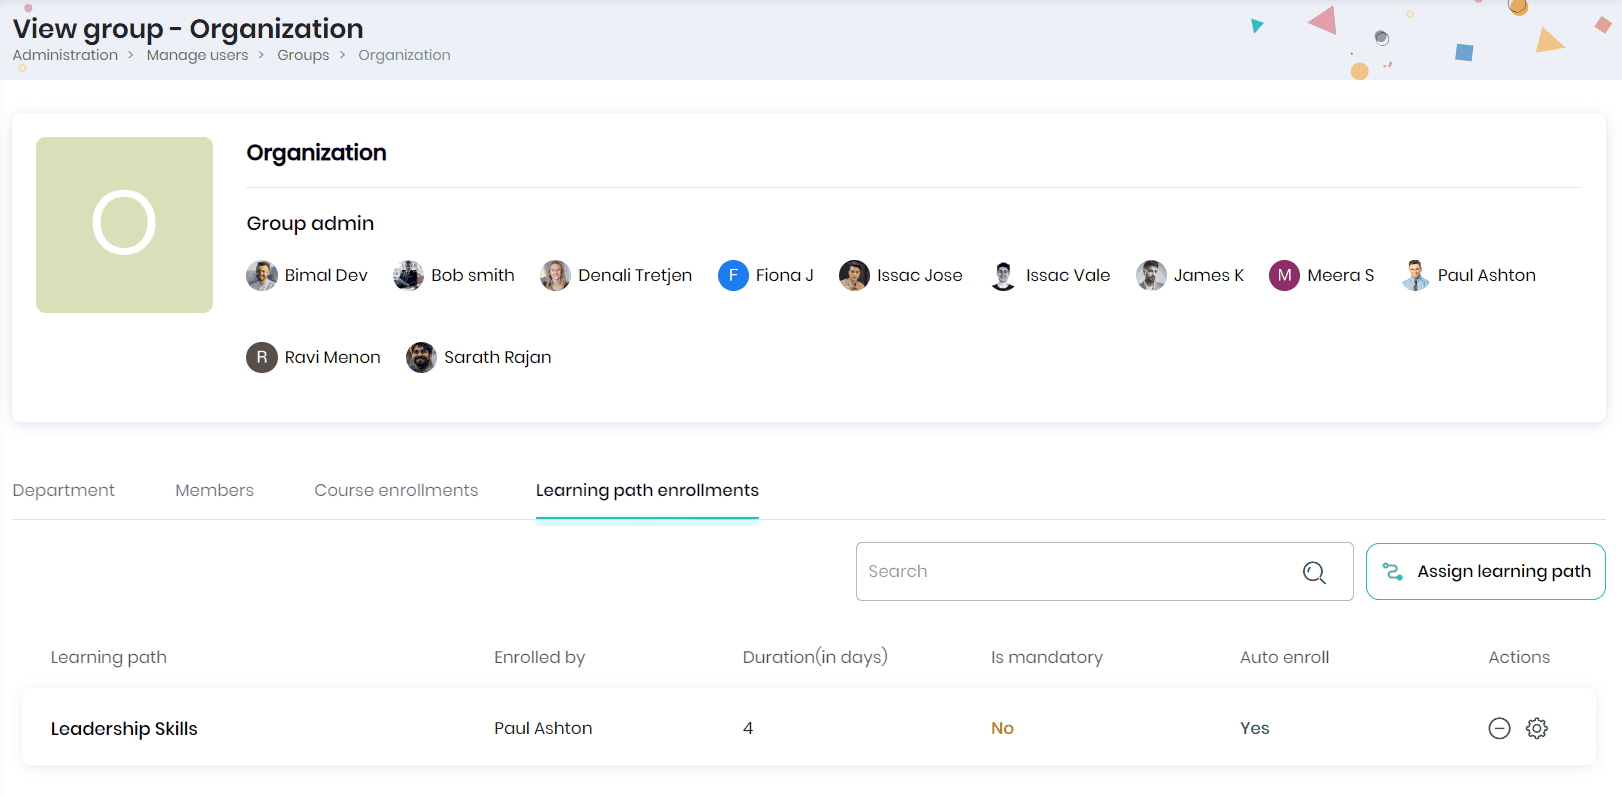
- The learning path name, enrolled by, duration (in days), is mandatory, auto enroll and actions.
- You may click on the Unenroll icon to unenroll the group from the learning path.
- Click on the Settings icon to edit the learning path enrollment settings.
